Growing & Care
Planting & Basic Care
How to plant, grow, and care for bulbs & flowers
Search our Growing & Care items:
(results displayed automatically below)
Planting
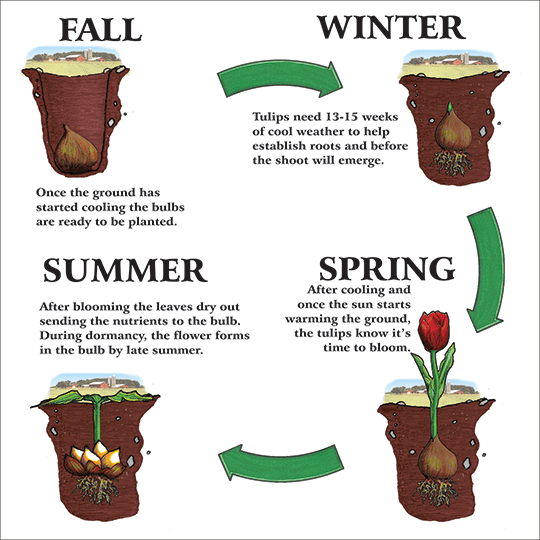
Spring blooming bulbs grow best in zones 3 – 8. There are always exceptions. Reach out to your local garden center to find out about your area. When to plant your bulbs depends on where you are located. High soil temperatures create an environment for many diseases that can attack bulbs. For this reason, we recommend that bulbs be planted when the soil temperature cools below 60 degrees, but before the ground freezes. This is generally late September through October. If you can dig in the soil, then they can be planted. If the ground is frozen, plant them in containers. Please be advised that planting late may result in poor flowering or stunted plants as they need time to grow roots before winter. Bulbs will not hold over until the following year.
1.) Bulbs should be planted in locations with partial to full sun. The soil warms quickly in these areas, so the flowers do not have to spend extra energy looking for light. Partial shade is acceptable for most shorter types, whereas the taller varieties will stretch (growing long and spindly) and be prone to falling over. The extra energy spent looking for light also makes them more susceptible to disease and less likely to bloom again. Planting under evergreens is not advisable as there is usually not enough light in the spring for the bulbs to grow. For hot climates, check with your local garden center.
Note: Each garden contains its own microclimate. Bulbs planted against the southern side of your house may bloom up to a week earlier than the same ones planted on the north side. Bulbs planted in dense shade may be twice as tall as those planted in full sun. Cities tend to be warmer than rural areas. Bulbs planted by a warm sidewalk may be pushed out of the ground earlier due to the warmth absorbed by the concrete. Early shoot growth in the fall doesn’t seem to affect the bulbs’ ability to bloom in the spring.
2.) Plant in well-drained, fertile soil. Too much water will drown the bulbs. Bulbs need air in the soil. Most bulbs will rot in standing water, so we recommend you avoid areas prone to flooding such as at the bottom of hills or especially under drainpipes. Raised beds can improve drainage. Be sure to raise them high enough, so when planted, they are above the soil line where the water sits. Avoid peat moss because it retains too much moisture during the winter. The pH level of the soil should be 7.0 so the plants can take up nutrients better. Lime can be added to soil that is acidic in order to raise the pH.
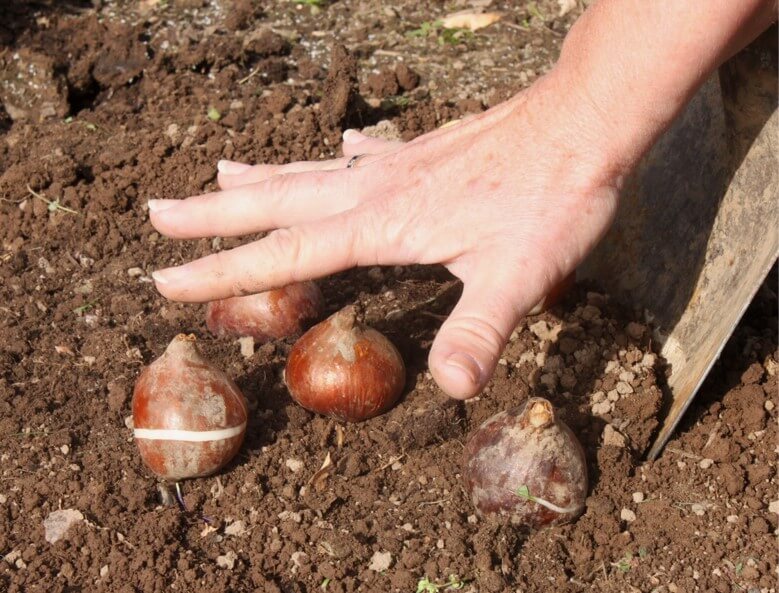
3.) Dig a hole a few inches deeper and wider than the bulbs you are planting. Tulip and daffodils are usually planted 6-8 inches deep and 2-3 inches apart. Officially spring blooming bulbs are planted 2.5 times deeper than the bulb is wide.
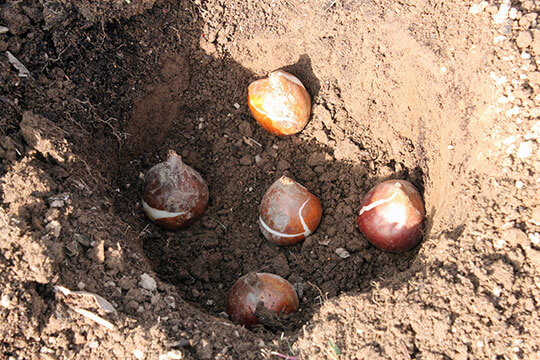
4.) Place bulb fertilizer in the bottom per package directions. Be sure it is not high in nitrogen. We use a 4-12-12. Cover the fertilizer with a little soil to avoid the bulbs coming in direct contact.
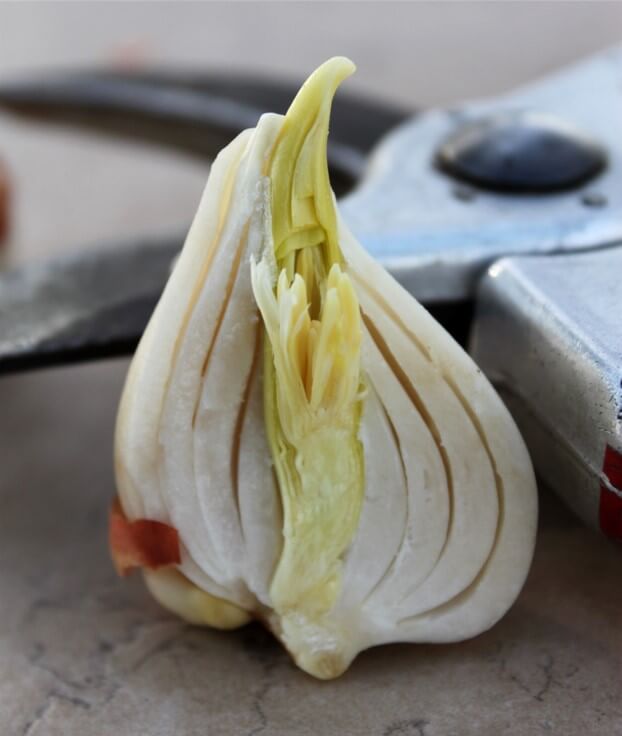
5.) Plant the bulbs. The brown outer covering of a tulip is called a tunic. This often protects the bulb early in the summer but by the time we ship the bulbs to you, these have broken off or cracked. This doesn’t hurt the bulb and actually makes it easier for the bulb to root. Place the bulbs in the hole with the tip up and cover with soil. This is the pointed end where the shoot will emerge. The base, where the roots will emerge, often appears as a round, flat area. Gravitropism is a big word that means your bulbs are internally programmed so that the roots grow down, and the shoots up! So, relax if you think your 3-year-old planted them upside down, the bulbs will figure it out. The only exception is Hyacinths… they will grow upside down if you plant them with the point side down.
6.) Lightly water after planting unless it has already started to rain, and the soil is moist. This helps the bulbs to send out their roots before winter. For some bulbs, like daffodils, the roots need to be well established before the ground freezes in winter.
The container needs to have good drainage holes and use soil that does not have a lot of peat moss or moisture retaining material, the deeper the pot the better. The bulbs that are on the shorter side will do better in pots. The flowers that stay shorter will need shorter root systems in order to have enough grip without falling over out of the pot. Plants that get taller than 20 inches need to be in very large pots or in the ground.
- Fill the pot half full with soil.
- Fertilizer per package directions.
- Cover the fertilizer with a little soil.
- Add the bulbs. When placing bulbs, they need to be 1-2 inches apart from one another and 1-2 inches away from the sides of the pot.
- Cover with soil.
- Water lightly.
Watch the weather for prolonged cold spells that could freeze your pots solid. When this happens, the water in the soil freezes and expands, damaging the bulb. Although the bulb has a protective layer of scales around its core, a long hard freeze will destroy it. Move these inside or mulch heavily. If you are not “forcing,” it is important that you allow the container to be out in the elements for the winter periods so that the bulbs are still getting their water and going through their needed cold for a spring bloom.
Tulips and Daffodils grow best in zones 3-8. There are always exceptions. Reach out to your local garden center to find out about your area.

The bulbs we sell need a winter with cold temperatures in order to establish roots and bloom. To grow spring bulbs in warm weather gardens (zone 9 and above), give them a “cold treatment.” Place bulbs in a mesh bag or plant them in small pots. When planting in pots, make sure the soil stays moist. Refer to your garden center on pre-chilling of bulbs. A reminder: Do not chill with fruit or open bottles of wine. Open the refrigerator daily for air circulation. After the allotted time, slowly introduce to warm weather by planting them in the ground or moving the pots to a partial/full-sun area. Water regularly, don’t overwater, or let the soil dry out.
- Crocus: 8-10 weeks
- Hyacinth: 12-14 weeks
- Botanical Iris reticulata: 10-12 weeks
- Leucoujum (Summer Snowflake): 8-10 weeks
- Muscari: 6-8 weeks
- Daffodils (Narcissus): 14-16 weeks
- Tulips: 14-16 weeks
Keep temperature between 32-42 degrees F, making sure the bulb does not freeze.
General Care
Disease and Pests
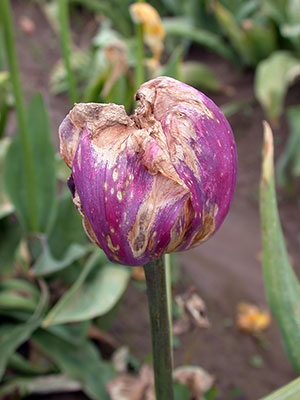
In late January and February, inspect for “fire heads” on tulips. This appears as gray fuzz on the tips of the foliage. These are actually botrytis spores and can spread to all your tulips. Pull out the entire infected plant and bulb, and discard to control the disease. Botrytis is called Tulip Fire because of its rapid spread. It can be prevented by rotating tulip bulbs every three years, removing flower heads before petals fall, and removing diseased/moldy looking leaves. Do not mulch diseased plants as it will only create a bigger problem.
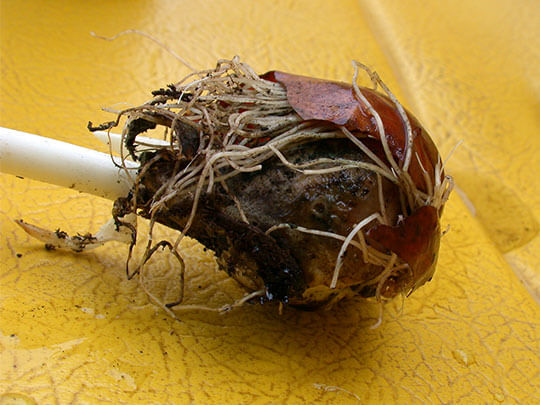
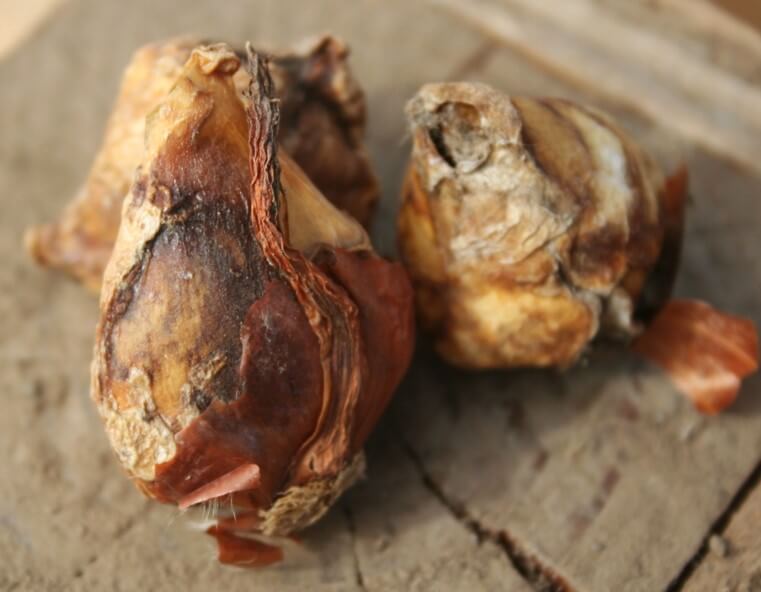
It is a disease, not just too much water. Bulbs can be affected by a number of different types of rot. Most rots are caused by bacteria and enhanced by wet soil. The best treatment is prevention. Plant only healthy bulbs that are firm at the base and feel heavy for their size. Look for discoloration under the skin that is in streaks, stripes or hard and dry patches. Inspect bulbs as you transplant. Discard those that have disease. Do not mulch diseased plants. Replant healthy bulbs in a different area. It takes 5 years for the disease organism to die in the soil when there is no host bulb.
Plants will look stunted, yellow and moldy. Remove the diseased plant by pulling the leaves and stem, causing the bulb to either come up or to die. Do not mulch diseased plants. Having space, good air circulation, and dry foliage between your bulbs will help prevent this disease. Using fungicide can help prevent disease as well.
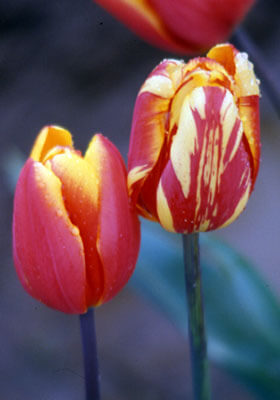
The most obvious symptom of viruses is that the color of the tulip has turned striped. Beautiful to look at, but the bulb will not last and aphids will spread the disease to other tulips. To remove the diseased plants, pull the leaves and the stem. The bulb might come up, if not, it will die because it has no leaves for nutrients. Do not mulch diseased plants. Using clippers can also spread the virus so clean them with a bleach solution (or just use your hands).
Gophers love to eat tulips. Moles don’t usually eat tulip bulbs unless the bulb is trying to rot and has bugs. Mice will use the runways of the gophers and moles to damage your bulbs. Planting tasty bulbs such as tulips in the middle of toxic bulbs such as daffodils seem to make them harder for rodents to find. For control of rodents, check with your local master gardeners. Another option is to plant in containers. These containers can be above ground or “mesh/wire” containers in the ground.
Deer love tulips; but not usually daffodils, alliums or fritillaries. There are a lot of deterrents, but the deer will get used to them, so you need to keep changing what you are using. Squirrels and raccoons can be attracted to freshly dug soil so be sure to water and pat down the soil when planting. Making sure that you have planted the tulips and daffodils the recommended 6-8 inches also helps deter the animals. Avoiding using bone meal. It has a strong odor that can attract rodents and dogs to dig up the bulbs.
Slugs and snails are notorious plant eaters. They eat both Tulips and Daffodils. They start eating the new growth even before the shoots are above the soil. They will also climb to the top of the daffodil flower stem to eat the new bud. Slug and snail bait can prevent this.
It is important to know what your pest is and how to treat it. You do not want to be treating insects when it may be a rot problem. Aphids are a small plant sucking bug which transmit diseases. They appear as the weather warms in the spring. Maggots, insect larva that look like fat white worms, are usually a secondary pest of tulips. Unhealthy bulbs that are beginning to rot attract maggots and worms.
Digging & Storing
Dig every 3-4 years for ground planting. While you do not need to dig and divide your tulips every year, they should be dug up at least every 3-4 years if planted in the ground. If you are not digging them up yearly, make sure they are not in an area of the yard where they will be watered all summer. Too much water over the summer will rot/kill your bulbs. If the bulbs are planted where you have to water, try to water only once a week or less.
Dig and separate the bulbs in early summer/June, only after the foliage has dried. Spring blooming bulbs should be dug every 3-4 years, depending on the variety and how well they are blooming. If you have a lot of leaves and small flowers, it is time to dig and spread out the bulbs so they can have enough space to produce a flower.
When digging the bulbs, start away from where you think the bulbs were planted as they usually spread. Save all the small bulblets that are healthy and firm. Even the small bulbs will eventually grow into larger bulbs.
Bulbs can be planted back in the ground immediately or stored in a cool, dry place until fall. Bulbs are always alive so store them in a well-ventilated container, in a place that does not exceed 80°F. Bulbs are living and need air. They are developing the flower inside, so handle them with care. Do not use a sawdust-like material around bulbs when storing. Do not store bulbs with fruit.
If you need to Dig up your bulbs:
- Snap Seed pod off after bloom
- Let Tulips Die Down, let leaves die off naturally
- Dig Up after leaves have died off
- Store in a cool dry place with air flow
1. Snap Seed pod off
When you take the flower head, seed pod off the stem you are letting the bulb know that it can start taking nutrients from the leaves back for a healthier bulb.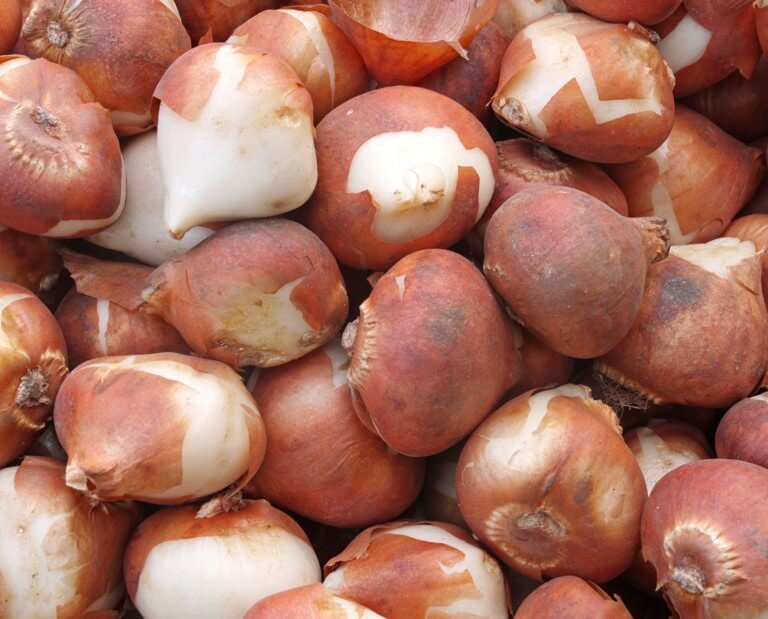
Healthy Bulbs Bad Bulbs
After blooming and the plant have dried down, the bulb keeps track of heat units. When they receive enough, a flower is formed for the coming season (for tulips, sometime in late July).
Flower bulbs are nature’s natural computer chips. They record the season’s temperature, moisture and air quality and when certain requirements are met, specific things happen. For example, when you plant your bulbs in the fall, a certain amount of moisture is needed for the roots to emerge. During the winter, most spring flowering bulbs need a certain amount of cold units before they will bloom.
2. Let Tulips Die Down
To best care for your bulbs, the leaves MUST be left alone until they are dry. The foliage manufactures the food that is being stored in the bulb for NEXT year’s flower.
Bulbs are actually a storage organ that helps the plant inside survive dormant periods.
- Sprinkle the seeds of wallflowers or Forget-Me-Not’s over your bulb planting in the fall. These fast growing plants will cover the leaves of the bulbs once the flower is gone in the spring.
3. Dig Up
June is a good time to lift tulips. Once the foliage on the plant has turned brown and dried, the bulbs are ready to be dug. Use a garden fork rather than a shovel to help minimize the risk of digging through any bulbs.
Tulips in cooler locations (hardiness zones 8 and under) do not have to be dug every year. To keep tulips healthy and productive, dig most tulips every three years.
Tulips do not like to be crowded, the more bulbs in their hole the smaller the bulbs become each year, and the fewer flowers that are produced.
Small bulbs produce only leaves, but if replanted and cared for, the small bulbs grow into larger bulbs that produce flowers the following year. In other words, if you have lots of leaves and little flowers it is time to dig up the bulbs and spread them out so they have room to get big enough to produce a flower.
If you only have a few leaves and small flowers the bulbs are probably getting too much water over the summer.
4. Store
Once the bulb is lifted from the ground clean off the old roots, they should separate easily from the cluster of bulbs. Separate all the bulbs; there may be different sizes and numbers under each plant.
Different varieties of tulips produce bulbs in different amounts and sizes. Of course, some years the weather may also affect your production. It is important that the bulbs are completely dry before storing or they will rot. To dry bulbs, put on a mesh tray in the shade outside for a day or two before storing them.
Store the bulbs for the summer in mesh bags, for plenty of air circulation, hung up in a cool place. An open box of wood or cardboard can be used also, but mice may more easily invade an open box.
The bulbs are alive and will suffer damage if stored in plastic or in boxes filled more than five inches in depth with bulbs. Good air circulation in storage is also important and never ever store in an airtight container. Keep the temperature below 90 F for best flowers in the spring.